Create a New Smartform Template
Create a new Smart Form Template
Commnia's Smart Forms allows you to create digital forms tailored to fit your specific data collection needs.
Setup and distribute your own forms in minutes.

All users within the company are able to access these form templates with read access only, unless users have the permission to edit.
1. Click on the main menu bar and select Smart Forms.
2. Navigate to Templates and click + New Template.
3. On the left-hand panel, select the field you would like to add to your Smart Form.
INSTRUCTIONS
Section
Organise your Smart Form by sections allowing you to organise relevant questions in their own groups
Text
Display read-only text, instructions within the form, these could range from greeting messages to text-based instructions that can be followed up with images or video.
Image
Embed images within the form allowing users to visually see the set of instructions or information you need them to see.
Video
Embed videos within the form giving you the flexibility to record exactly how you want inspections or site inductions to occur and have the user view the video. Reducing misinterpretation and allowing for a more transparent communication.
QUESTIONS

Please do not collect password or CVV using Commnia Forms. Click here to learn more.
Single Line
Collect single-line responses, ideal for brief entries like names, emails, phone numbers, or city names.
Multiline
Use for longer responses, such as addresses, notes, observations, or detailed descriptions allowing the user to enter multiple lines of text
Numbers
Allows the user to answer using numbers only giving you more control over the data entered in your forms.
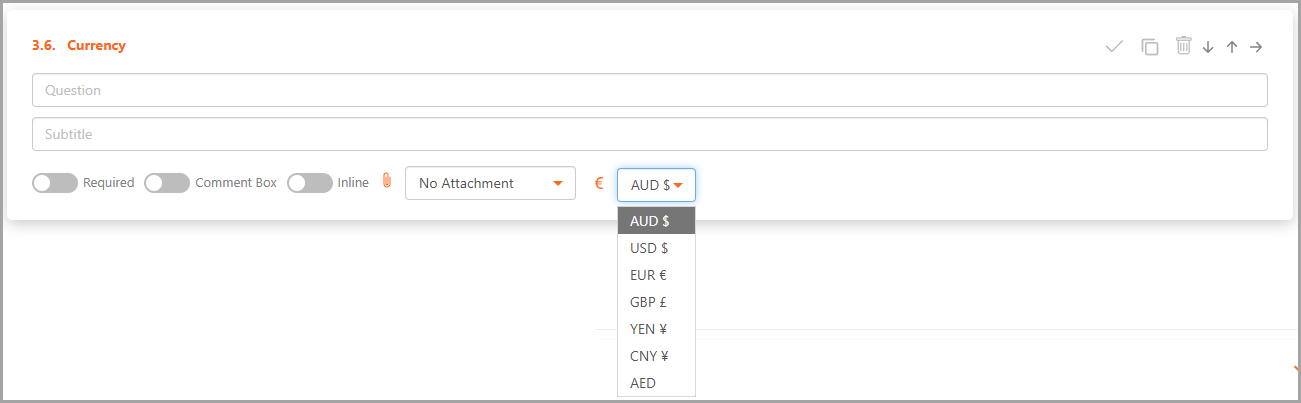
Currency
Allows the form builder to assign a question that requires currency input, for example expected hourly rate.
Date Selector
Provide a date selection tool for users, enhancing form structure and data accuracy
Date-Time Selector
Offer a time selection option for entries that require precise date and time data
Dropdown
Allow users to select one option from a pre-defined list.
Single Select
Similar to the drop-down, but all options are visible at once.
Multiselect
Use when users need to select multiple options from a list, for example languages spoken.
Pin Signature
Allows the user to digitally sign the Smartform or trigger a different person to sign via mobile phone code authentication.
Hand Signature
Allows user to digitally hand sign their signature.
Table
Allows the user to insert a table with columns, users are allowed to enter an infinite number of rows when entering the information.
GPS Location
Lets users to capture their real-time location based on GPS data. View Map takes you to a new browser and shows you the location on a map.
Human Body Map
Allow user to select body parts.
FUNCTIONS
Required
Allows the user to make it a required question represented on the question with a *
Comment Box
Allows the user to add an additional comment box
Inline
Allows the user to have the question inline with the answer
Attachments
Allows the user to upload images, videos, or documents directly from their devices, or use the camera to capture images in real-time
4. Once you have added and organised all your modules, click Save.
Form Security
Select one of the following options:
Private
Select this option for Smart Forms which will gather confidential information. Access is restricted to the sender and the recipients
Project
Select this option to allow access to the sender and the recipient’s companies.
Add Form Details
- Form Name – Give your Smart Form a name.
- Form Category – Give your Smart Form a category.
- Approval Required (Optional) – Tick this box if you require an authoriser to approve or reject submissions of this Smart Form.
- Location Required (Optional) - Tick this box if you require a location to be assigned to the form.
- Save to Community Templates - this form will be made available for the community to download
- Related Project (Optional) - You can assign the form template to a project.
- Form Description – Add a description for how this Smart Form should be used.
- Due Date Settings - Tick this box if you require a due date to be assigned to the form.
- Default due after (days) - Enter the number of days after the form is issued. Leave empty for no default due date.
- Form Security -
- Recipients and Sender: This option restricts who can view and complete the form, only the sender and recipients are able to access and submit the form.
- Recipients, sender and their colleagues: This option allows everyone in that particular project to access and complete the form.
Click Save as Draft or Publish.
Toggle Show Draft to View Draft or Published Forms
Related Articles
Add sections to a Smart Form
1. Click Forms in the main menu bar, navigate to Templates. 2. Click + New Template. 3. On the left-hand panel, select Section. 4. Type in your section name. 5. Add your questions under this section. 6. Add another section field to create a new ...How to add an Image and Embed Videos to Form Template
In Commnia you can add an image or embed a video to your form template with these easy steps; How to add an Image 1. From the form builder panel, click Image 2. Click on the Insert Image Icon 3. Open the image location folder, select - open 4. Click ...How to Copy a Smart Form Template
If you like to copy an existing Commnia Smart Form, you can do so by following below steps; 1. Navigate to the menu bar icon and click Smart Forms under Quality + Safety. 2. Select Templates. You will see a list of forms you currently have access to. ...How to add a hyperlink to a drawing in your Commnia Form Template
When building your form template you may find you need to add a link to a drawing or document in Commnia Document Register. From the form builder, under Instructions options click on any of the options. (For our example we have clicked Text). A new ...Smart Forms Category | Create New Form Category
From the Smart Forms Control Panel, you can create and manage form categories used when creating a new form template. 1. Smart Form Settings On the far right, click the cog and it will take you to control panel. Click Smart Forms. 2. Manage and ...